0%

因为基本上没什么人直接使用 armcc 作为自动化编译、持续集成和交付的工具,更多是使用 UV4 软件读取 .uvprojx 文件来获取编译信息,进而驱动 armcc 进行编译过程。

通过自行编辑 Makefile 文件,使用 make 和 armcc 工具可以对代码文件进行编译,可以进行静态库的生成,也可以生成可烧录文件,但是就不要想着复杂的 make test 等测试功能了。

DIFF BETWEEN THEM

下方详细描述一下使用 arm-none-eabi-gccmakecmakearmccmake 的不同。

  1. 使用 arm-none-eabi-gccmake 编译的 SDK 过程属于 Unix Makefile 编译过程(详见 CMake 工具及官网对 CMakefiles Generators 说明)。暂时不清楚使用 armcccmake 是如何生成 Makefile 的,因为尚不了解toolchain的绑定过程,导致一致检测到的是 windows平台本地的 mingw 工具。
  2. 启动文件不同。详见 ABOUT STARTUP FILE
  3. 工具链指定方式不同。详见 TOOLCHAIN

KEIL MDK ENV

MDK SOFTPACK

MDK5 Software Packs

TOOLCHAIN DOWNLOADS

首先需要安装版本较新的 Keil MDK-ARM 开发软件。最好是在Windows上安装,方便破解。

可以从 About uVision 中查看版本信息。也可以直接在 PowerShell 中直接调用查看。

MDK 的版本为 v5.22 确实是比较老旧的,建议下载 v5.27 及以上版本。

下载链接:MDKv5.28MDKv5.37keygen

官网下载:ARM Compiler 5 Downloads

image-20220608100300944
image-20220608100748964

TOOLCHAIN

下面的一些参数可以从 ARM Compiler v5.06 for uVision armcc User Guide 获取帮助。

FROMELF

1
2
3
4
5
6
7
8
9
10
11
12
13
14
15
16
17
18
19
20
21
22
23
24
25
26
27
28
29
30
31
32
33
34
35
Options:
--help display this help screen
--vsn display version information
--output file the output file. (defaults to stdout for -text format)
--nodebug do not put debug areas in the output image
--nolinkview do not put sections in the output image

Binary Output Formats:
--bin Plain Binary
--m32 Motorola 32 bit Hex
--i32 Intel 32 bit Hex
--vhx Byte Oriented Hex format

--base addr Optionally set base address for m32,i32

Output Formats Requiring Debug Information
--fieldoffsets Assembly Language Description of Structures/Classes
--expandarrays Arrays inside and outside structures are expanded

Other Output Formats:
--elf ELF
--text Text Information

Flags for Text Information
-v verbose
-a print data addresses (For images built with debug)
-c disassemble code
-d print contents of data section
-e print exception tables
-g print debug tables
-r print relocation information
-s print symbol table
-t print string table
-y print dynamic segment contents
-z print code and data size information
1
2
3
4
5
6
7
8
9
10
11
12
13
14
15
16
17
18
19
20
21
22
23
24
25
26
27
28
29
30
31
32
33
34
35
36
37
38
39
40
41
Usage: armlink option-list input-file-list
where
option-list is a list of case-insensitive options.
input-file-list is a list of input object and library files.

General options (abbreviations shown capitalised):
--help Print this summary.
--output file Specify the name of the output file.
--via file Read further arguments from file.

Options for specifying memory map information:
--partial Generate a partially linked object.
--scatter file Create the memory map as described in file.
--ro-base n Set exec addr of region containing RO sections.
--rw-base n Set exec addr of region containing RW/ZI sections.

Options for controlling image contents:
--bestdebug Add debug information giving best debug view to image.
--datacompressor off
Do not compress RW data sections.
--no_debug Do not add debug information to image.
--entry Specify entry sections and entry point.
--libpath Specify path to find system libraries from.
--userlibpath Specify path to find user libraries from.
--no_locals Do not add local symbols to image symbol table.
--no_remove Do not remove unused sections from image.

Options for controlling image related information:
--callgraph Create a static callgraph of functions.
--feedback file Generate feedback that can be used by the compiler in file.
--info topic List misc. information about image.
Available topics: (separate multiple topics with comma)
common List common sections eliminated from the image.
debug List eliminated input debug sections.
sizes List code and data sizes for objects in image.
totals List total sizes of all objects in image.
veneers List veneers that have been generated.
unused List sections eliminated from the image.
--map Display memory map of image.
--symbols List symbols in image.
--xref List all cross-references between input sections.

--summary_stderr

ARMCC

1
2
3
4
5
6
7
8
9
10
11
12
13
14
15
16
17
18
19
20
21
22
23
24
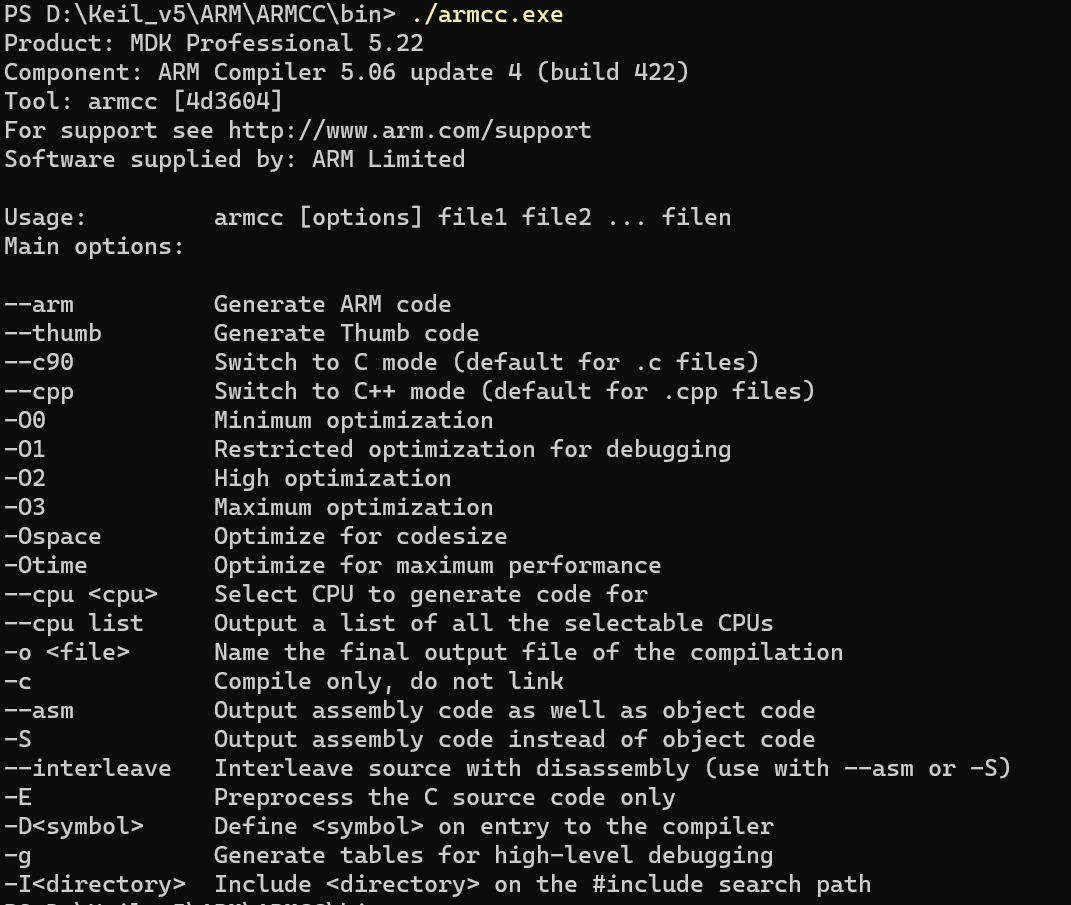
Usage:         armcc [options] file1 file2 ... filen
Main options:

--arm Generate ARM code
--thumb Generate Thumb code
--c90 Switch to C mode (default for .c files)
--cpp Switch to C++ mode (default for .cpp files)
-O0 Minimum optimization
-O1 Restricted optimization for debugging
-O2 High optimization
-O3 Maximum optimization
-Ospace Optimize for codesize
-Otime Optimize for maximum performance
--cpu <cpu> Select CPU to generate code for
--cpu list Output a list of all the selectable CPUs
-o <file> Name the final output file of the compilation
-c Compile only, do not link
--asm Output assembly code as well as object code
-S Output assembly code instead of object code
--interleave Interleave source with disassembly (use with --asm or -S)
-E Preprocess the C source code only
-D<symbol> Define <symbol> on entry to the compiler
-g Generate tables for high-level debugging
-I<directory> Include <directory> on the #include search pat

MAKEFILE

make 可以在任一路径下执行,只需要加入 -C <path> 即可,即告诉make工具在 <path> 路径下执行编译。方便了在 windows 命令行环境下的执行。

编写 Makefile 的时候,某些变量可以通过外部传递,而且方法也很简单,甚至内部甚至不需要声明,只需要在引用处写明变量名称即可。然后外部调用时以 VARIABLE="value" 的形式进行声明即可。如下:

1
make libmxs -C 20220607 MANIFEST_PATH="F:\Workspace\20220511-galileo-manifest" TOOLCHAIN_PATH="D:\Keil_v528\ARM\ARMCC\bin"

COMPILING CONTROL STRINGS

下面这些编译参数是复制自 KEIL IDE 的,对应的平台是 STM32L4R9。

1
2
3
4
5
6
7
8
9
10
11
12
13
14
15
16
17
18
19
20
21
22
23
24
25
--c99
-c
--cpu Cortex-M4.fp
-D__MICROLIB -g -O3 --apcs=interwork --split_sections

-I ../app
-I ../M_BSP
-I ../M_BSP/BMM150
-I ../M_BSP/Sensor_R1
-I ../M_BSP/lps33k
-I ../M_BSP/lcd
-I ../M_BSP/PSRAM
-I ../M_BSP/OSPI_NOR
-I ../Driver
-I ../../../Drivers/CMSIS/Include
-I ../../../Drivers/CMSIS/Device/ST/STM32L4xx/Include
-I ../../../Drivers/STM32L4xx_HAL_Driver/Inc
-I ../../../Drivers/BSP/STM32L4R9I_EVAL
-I ../../../Drivers/BSP/Components/Common

-I./RTE/_Watch_EVAL
-IC:/Users/mixo/AppData/Local/Arm/Packs/ARM/CMSIS/5.5.1/CMSIS/Core/Include
-IDrivers/CMSIS/Device/ST/STM32L4xx/Include
-D__UVISION_VERSION="528" -D_RTE_ -DSTM32L4R9xx -DUSE_HAL_DRIVER -DUSE_GVO_390x390
-o .\Watch\*.o --omf_browse .\Watch\*.crf --depend .\Watch\*.d

TOOLCHAIN

在 Makefile 文件中,往往为了互相兼容,默认编译器的名称就是 gcc ,只是前缀不同而已,而 armcc 编译器在使用时则需清晰指定名称。

下方为 armcc 工具链的指定方式:

1
2
3
4
5
6
# 工具链
CC=$(TOOLCHAIN_PATH)\"armcc.exe"
AS=$(TOOLCHAIN_PATH)\"armasm.exe"
AR=$(TOOLCHAIN_PATH)\"armar.exe"
LINK=$(TOOLCHAIN_PATH)\"armlink.exe"
FROM_ELF=$(TOOLCHAIN_PATH)\"fromelf.exe"

下方为 arm-none-eabi-gcc 工具链的指定(由 stm32 CubeMX 生成)。

1
2
3
4
5
6
7
8
9
10
11
12
13
14
15
16
PREFIX = arm-none-eabi-
# The gcc compiler bin path can be either defined in make command via GCC_PATH variable (> make GCC_PATH=xxx)
# either it can be added to the PATH environment variable.
ifdef GCC_PATH
CC = $(GCC_PATH)/$(PREFIX)gcc
AS = $(GCC_PATH)/$(PREFIX)gcc -x assembler-with-cpp
CP = $(GCC_PATH)/$(PREFIX)objcopy
SZ = $(GCC_PATH)/$(PREFIX)size
else
CC = $(PREFIX)gcc
AS = $(PREFIX)gcc -x assembler-with-cpp
CP = $(PREFIX)objcopy
SZ = $(PREFIX)size
endif
HEX = $(CP) -O ihex
BIN = $(CP) -O binary -S

COMPILING PARAMETERS

总结出常见的编译参数如下:

MACRO DEFINITIONS

宏定义参数:-DUSE_HAL_DRIVER / -DSTM32L4R9xx / -D__MICROLIB

其中,前两个还是要依具体芯片的硬件参数来看的

CPU

CPU 参数:--cpu Cortex-M4.fp / --cpu Cortex-M4 等。

使用armcc --cpu list 命令可以查看所有可接受的芯片,如下:

1
2
3
4
5
6
7
8
9
10
11
12
13
14
15
16
17
18
19
20
21
22
23
24
25
26
27
28
29
30
31
32
33
34
35
36
37
38
39
40
41
42
43
44
45
46
47
48
49
50
51
52
53
54
55
56
57
58
--cpu=4
--cpu=4T
--cpu=5T
--cpu=5TE
--cpu=5TEJ
--cpu=6-M
--cpu=6S-M
--cpu=7-A
--cpu=7-R
--cpu=7-M
--cpu=7E-M
--cpu=7-A.security
--cpu=ARM7EJ-S
--cpu=ARM7TDMI
--cpu=ARM720T
--cpu=ARM7TDMI-S
--cpu=ARM9TDMI
--cpu=ARM920T
--cpu=ARM922T
--cpu=ARM9E-S
--cpu=ARM926EJ-S
--cpu=ARM946E-S
--cpu=ARM966E-S
--cpu=Cortex-M0
--cpu=Cortex-M0plus
--cpu=SC000
--cpu=Cortex-M1
--cpu=Cortex-M1.os_extension
--cpu=Cortex-M1.no_os_extension
--cpu=Cortex-M3
--cpu=Cortex-M3-rev0
--cpu=SC300
--cpu=Cortex-M4
--cpu=Cortex-M4.fp.sp
--cpu=Cortex-M7
--cpu=Cortex-M7.fp.sp
--cpu=Cortex-M7.fp.dp
--cpu=Cortex-R4
--cpu=Cortex-R4F
--cpu=Cortex-A5
--cpu=Cortex-A5.vfp
--cpu=Cortex-A5.neon
--cpu=Cortex-A7
--cpu=Cortex-A7.no_neon
--cpu=Cortex-A7.no_neon.no_vfp
--cpu=Cortex-A8
--cpu=Cortex-A8.no_neon
--cpu=Cortex-A8NoNEON
--cpu=Cortex-A9
--cpu=Cortex-A9.no_neon
--cpu=Cortex-A9.no_neon.no_vfp
--cpu=Cortex-A12
--cpu=Cortex-A12.no_neon.no_vfp
--cpu=Cortex-A15
--cpu=Cortex-A15.no_neon
--cpu=Cortex-A15.no_neon.no_vfp
--cpu=Cortex-A17
--cpu=Cortex-A17.no_neon.no_vfp

ABOUT STARTUP FILE

CubeMX 针对不同的编译方式和平台生成对应的 startup file 。而使用 Unix Makefile 编译的 startup_stm32l476xx.s 和 使用 Keil MDK-ARM 的是不一样的。

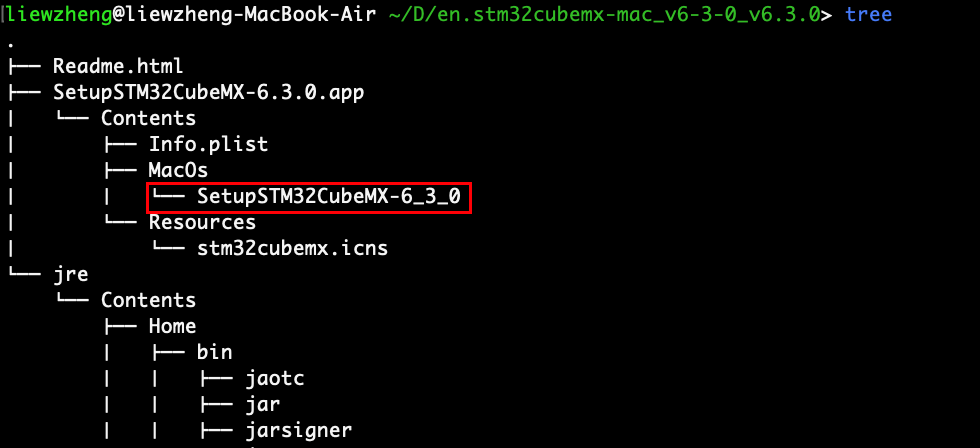
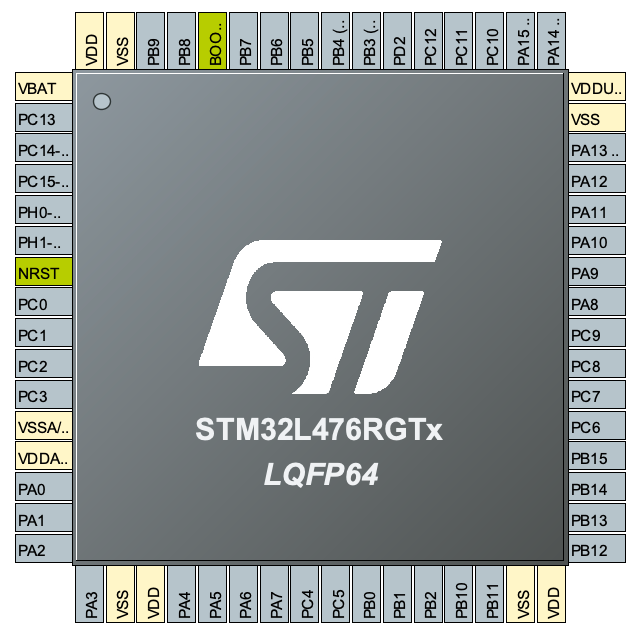
startup_stm32xxxxxx.s 是使用汇编语言写好的基本程序,当STM32 芯片上电启动的时候,会执行此处的汇编程序,从而建立 C 语言的运行环境,所以称之为启动文件。

由于编译器不一致,所以 .s 的启动文件也不能互相兼容,需要使用 CubeMX重新生成。

image-20220609110616631
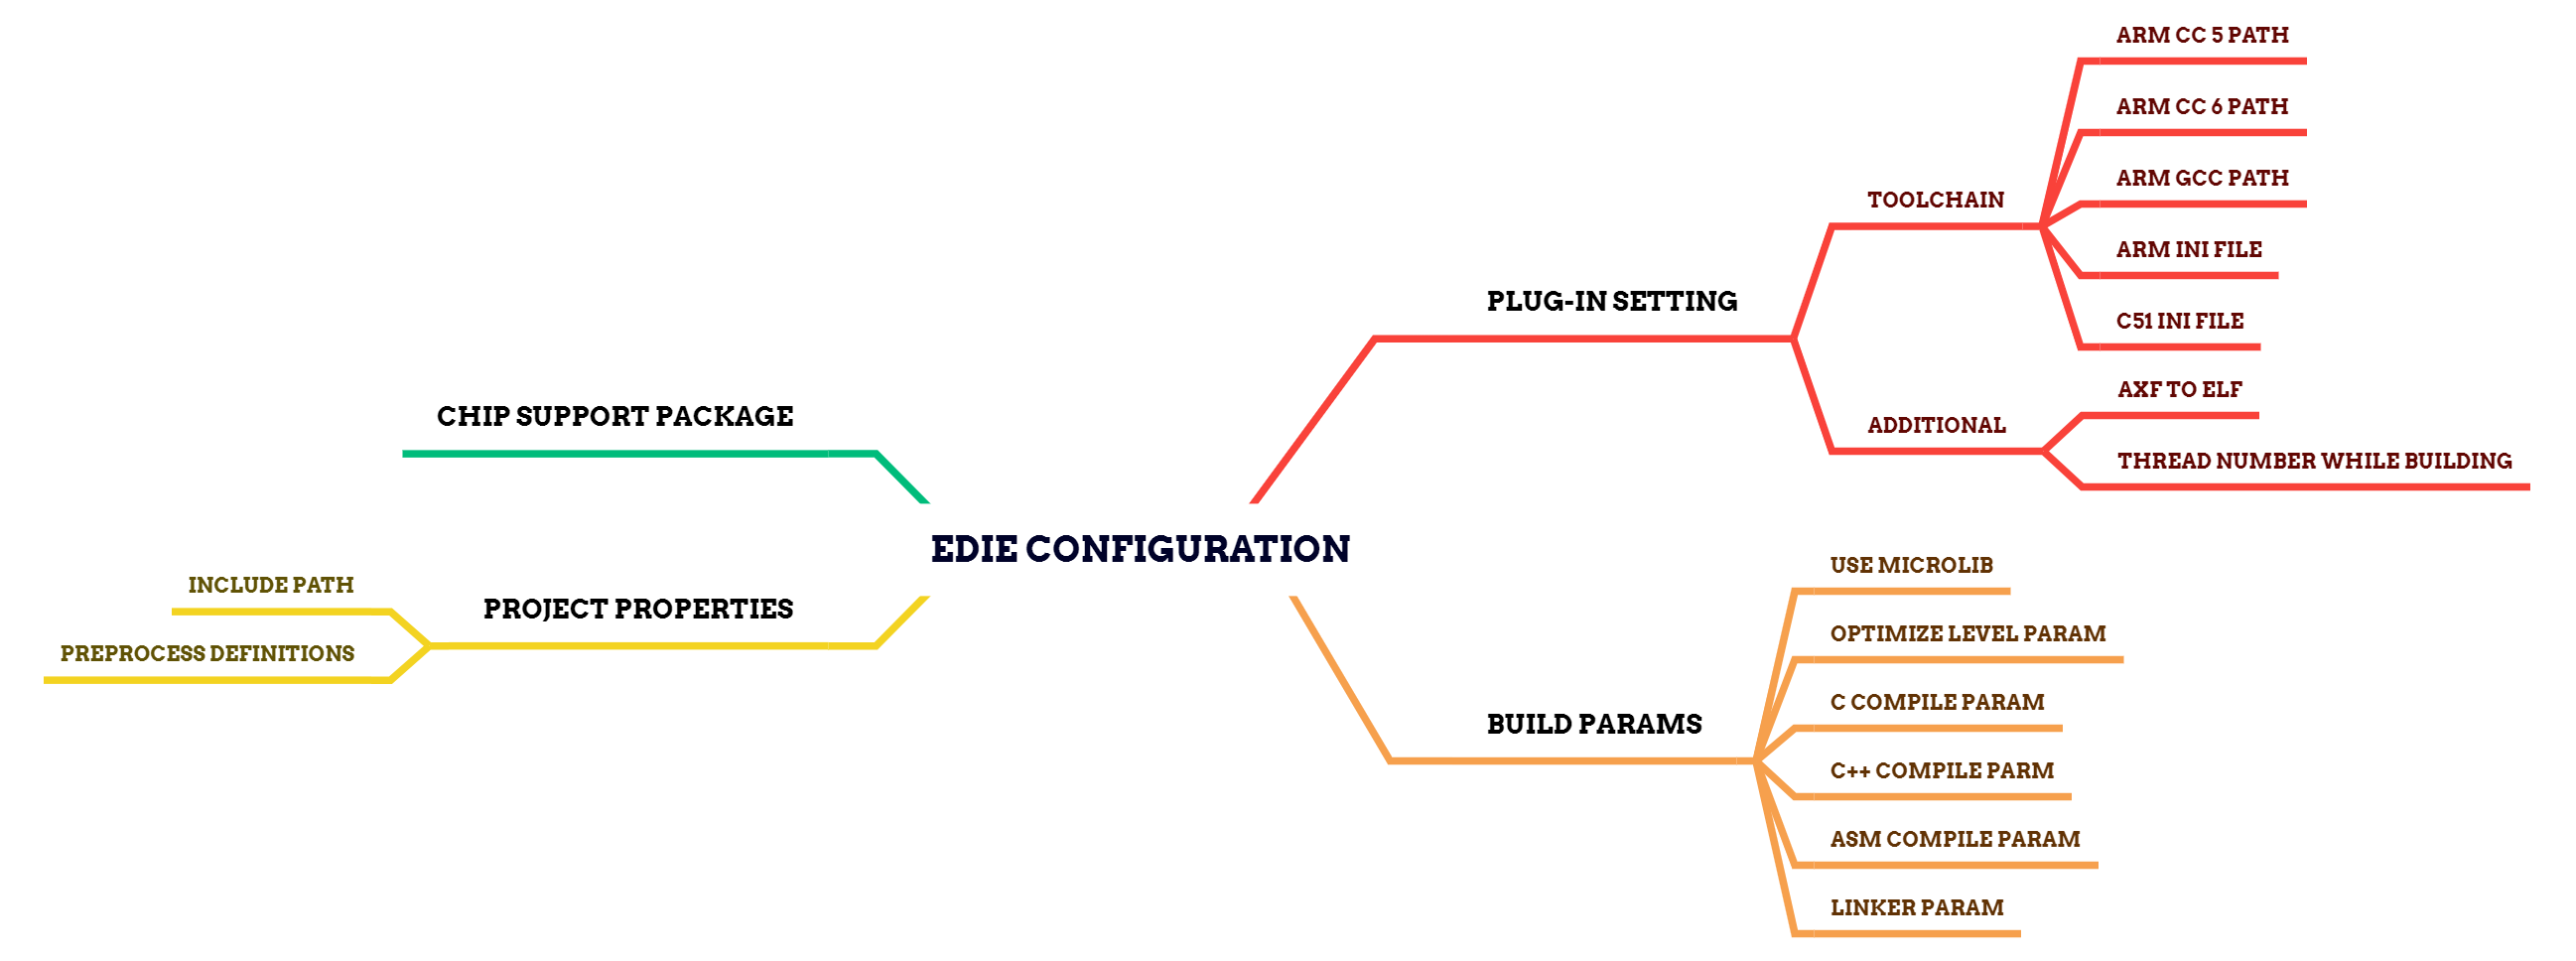
DEBUG

ERROR

ERROR #
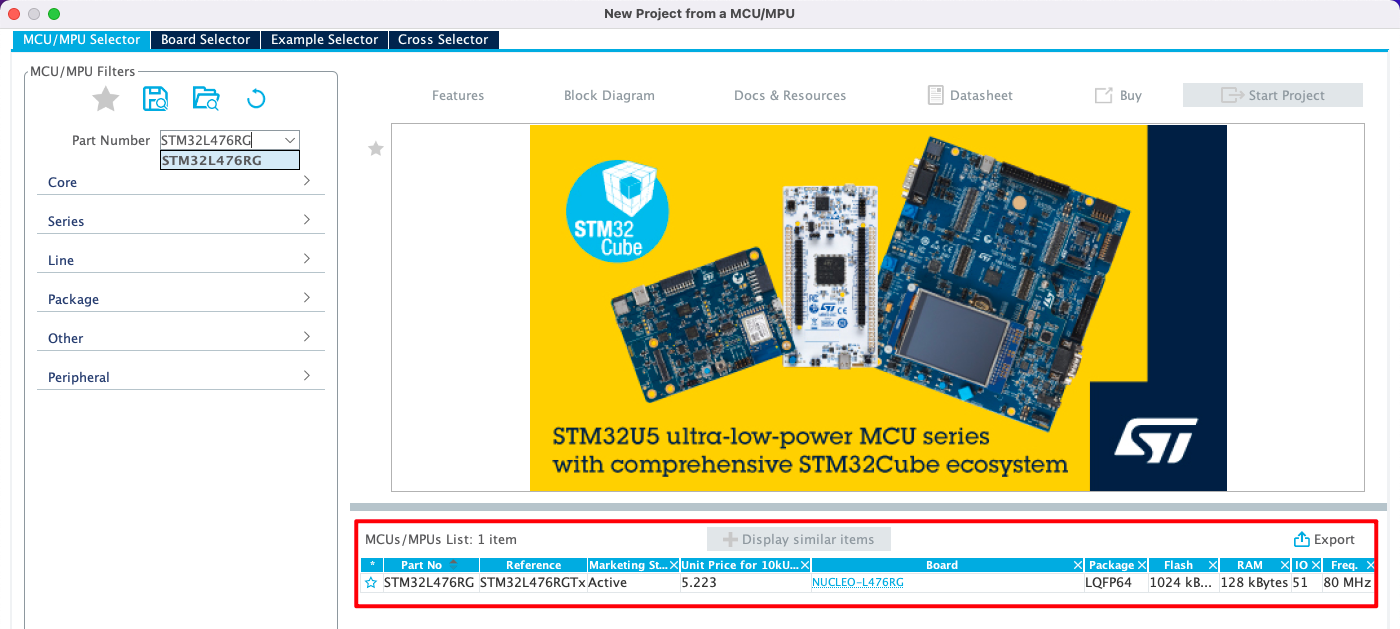
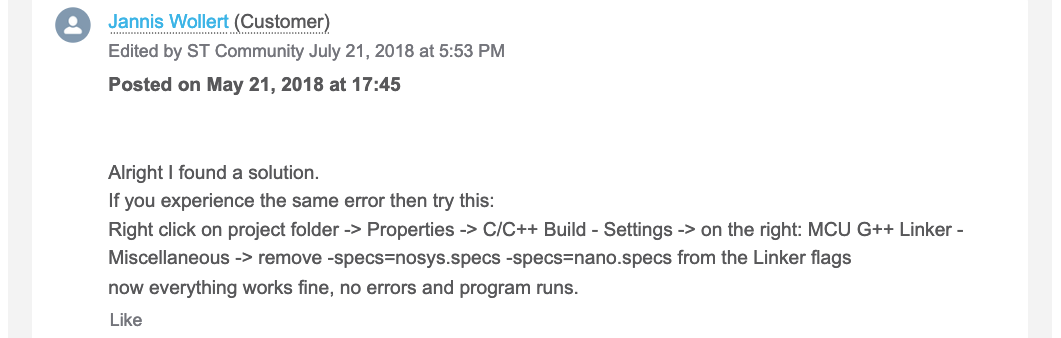
35: PLEASE SELECT FIRST THE TARGET STM32L4XX DEVICE USED IN YOUR APPLICATION

image-20220608105439447
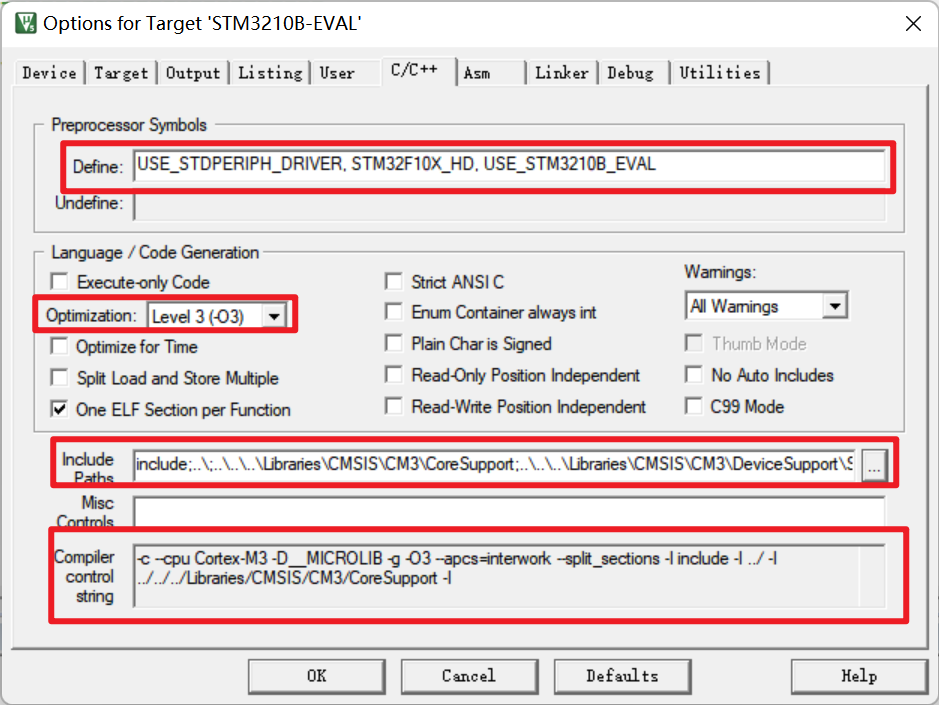
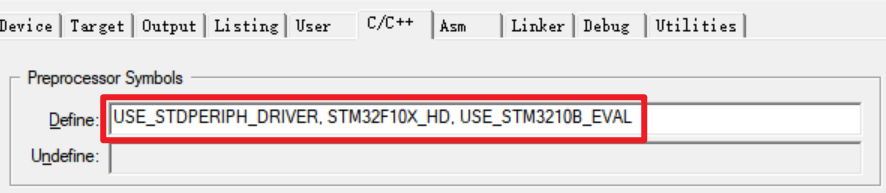
没有添加宏定义,添加 -DSTM32L476xx-DUSE_HAL_DRIVER 即可。

ERROR 
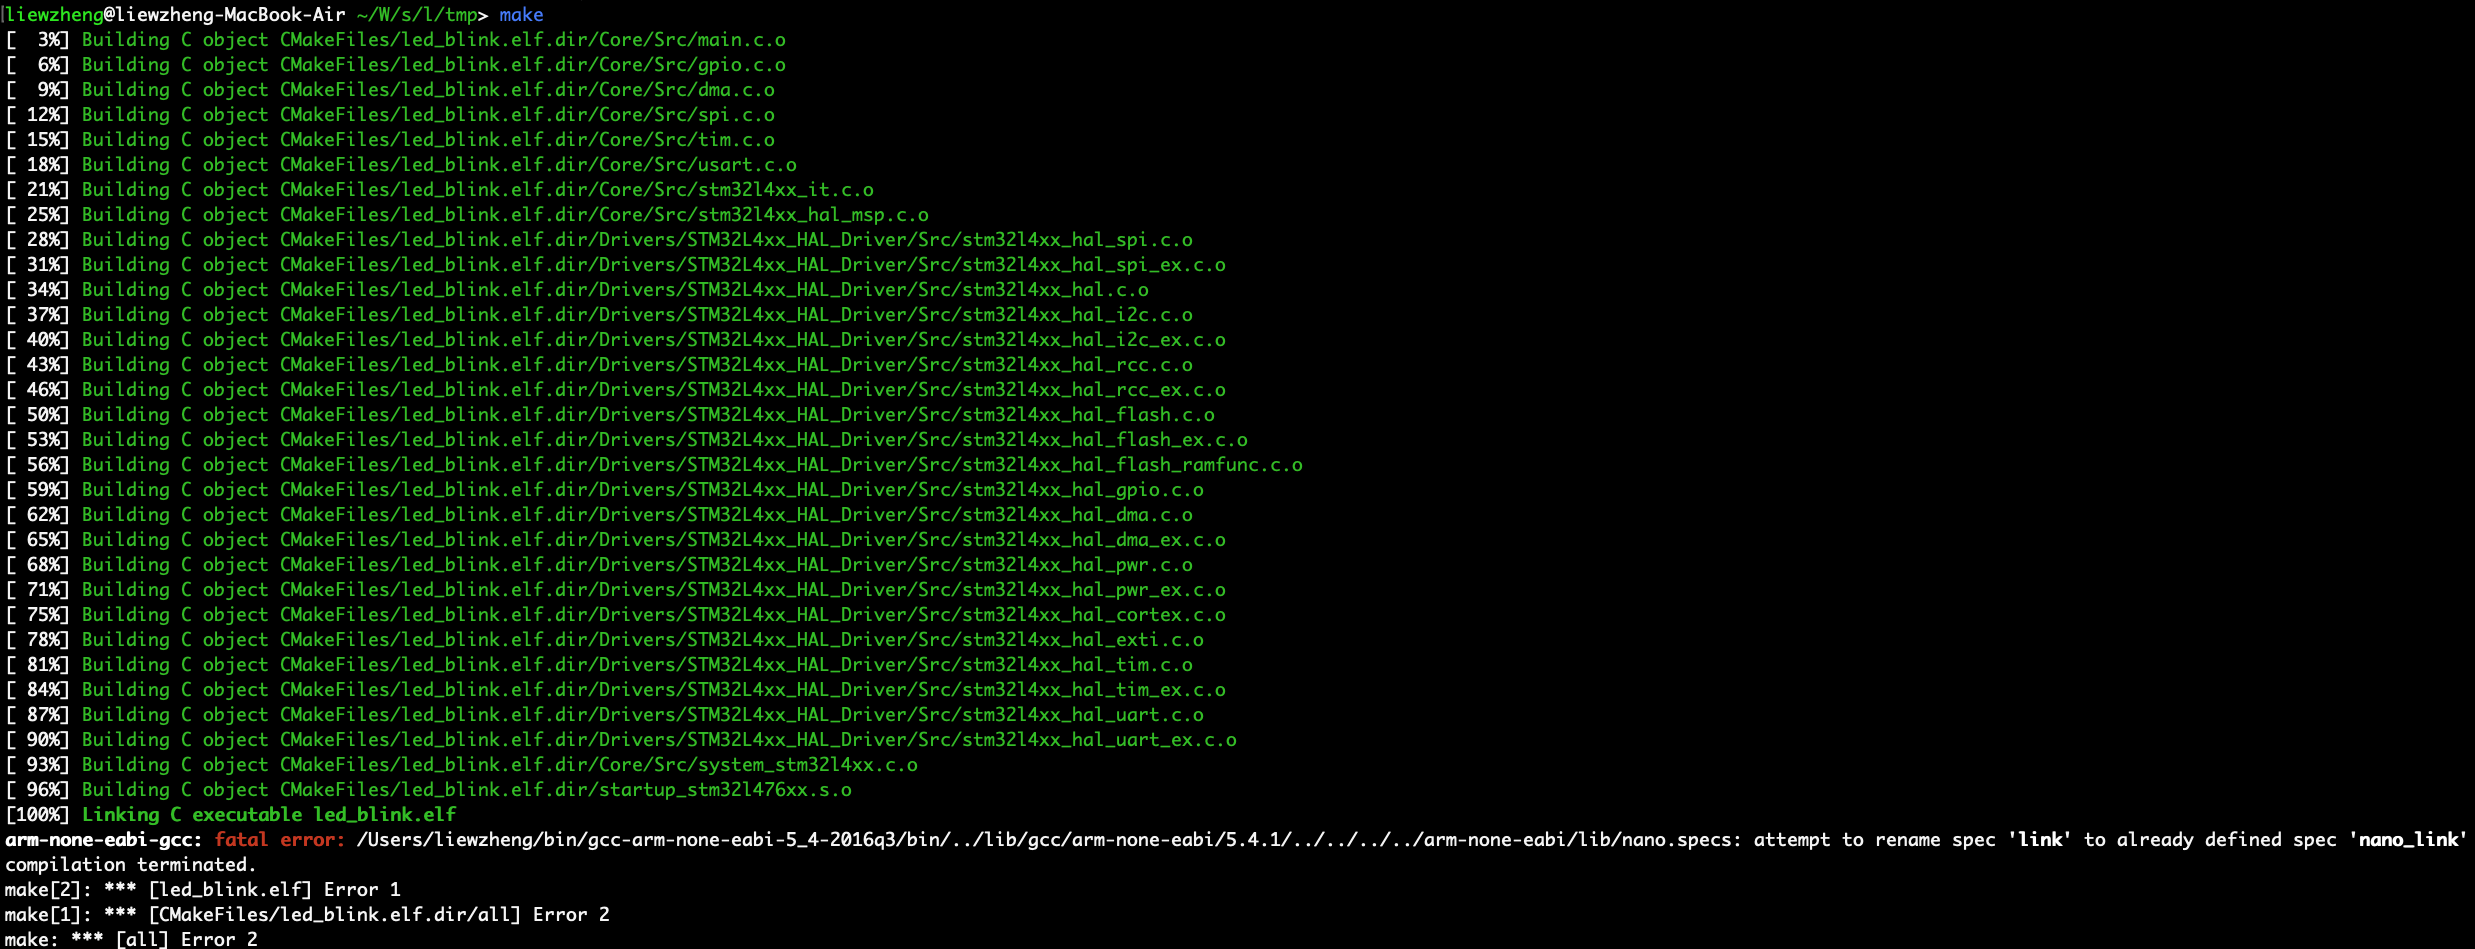
L6050U: THE CODE SIZE OF THE IMAGE EXCEEDS THE MAXIMUM

image-20220608110734097
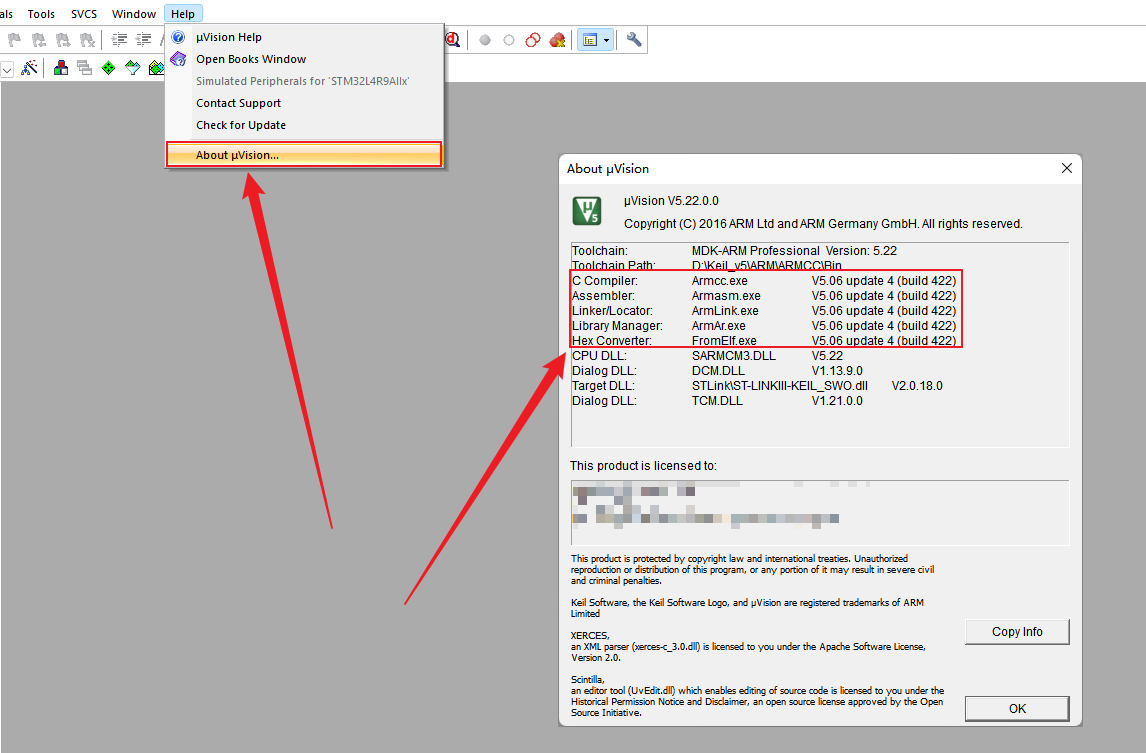
版权问题,当你在使用keil时,出现 error: L6050U: The code size of this image (45178 bytes) exceeds the maximum allowed for this version of the linker. 的时候,那就是 keil 没有被破解,软件本身的字节数有局限性,需要下载个MDK注册机进行破解!

Error: A1854E: Unknown opcode 'BLX', maybe wrong target CPU?

image-20220608151900214

WARNING

Warning: #1295-D: Deprecated declaration two_wired_resync - give arg types

image-20220608135309057

在传递参数为空的函数中,必须写 void ,armcc要求比较严格,arm-none-eabi 的要求比较宽松。

REFERENCE

  1. keil编译链接过程以及ARMCC、ARMASM、FROMELF、ARMLINK、ARMAR的使用
  2. ARM Compiler v5.06 for uVision armcc User Guide
  3. ARM® Compiler v5.06 for μVision®

Common Tools

软件启动:utools / alfred

小插件合集:utools

文件搜索:everything(windows)

MD:Typora(插件Pandoc)

图床:picgo

自由:V2Ray-Core / ClashX

网站视频下载:Downie4

截图:Snipaste

解压:Bandizip

思维导图:Xmind

翻译:deepl /

Engineer

BASH:zsh(Oh-my-zsh)

终端插件:fig

zsh皮肤:powerlevel10k

Python

代码编辑器:Jupyter Lab(比Notebook更好用)

Python环境管理工具:Miniconda

Python常用库:

1
pip install pandas xlrd openpyxl xlsxwriter requests lxml html5lib BeautifulSoup4 matplotlib seaborn plotly bokeh scipy statsmodels python-frontmatter opencv-python

Embedded

VS code 插件

git痕迹查看:GitLens

代码注释:Doxygen

Keil开发代替IDE:EIDE

Compiling

交叉编译:cmake / make

单元测试:valgrind lcov

Jenkins

environment Injector

Publish Over FTP

CMake

xUnit

Linux

  • rsync :同步文件。
  • tree :目录树

奇淫巧技

文本替换

object 类型文本替换

object 目前还没有找到替换方法,可以将 object 类型转换成 string 数据类型,再用 str.replace() 方法进行文本替换。

  1. .astype('string') 方法将 object 类型转换成 string 类型。
  2. 使用 .str.replace(<old-string>,<new-string>) 方法对文本进行替换。并使用 tmp 变量进行保存。
  3. tmp 变量重新赋值给原来的变量。
1
2
3
pdata['timestamp'] = pdata.timestamp.astype('string')  # 将 object 类型转换成 string类型
tmp = pdata['timestamp'].str.replace('BIN3-','')
pdata['timestamp'] = tmp

DEBUG RECORD

nonetype object is not subscriptable

大概意思就是,这个 timestampobject 数据类型,替换了之后这个不能显示了估计。

image-20220522012451872

本文是介绍嵌入式工程师的CLI编译工具部署方法,所用编译器是 ARM GCC,即 gcc-arm-none-eabi ,案例也是使用 STM32 CubeMX 生成的文件。中间涉及到一些 单元测试 相关的插件安装可以视情况选择或弃用。

下方的操作需要提前安装好 Windows子系统Linux(WSL,Windows Subsystem Linux)或者 虚拟机,且确保使用的是 shell 是 zsh,否则下方的一些配置文件(如 ~/.zshrc )需要手动改成对应 shell 的配置文件。

安装软件

image-20220507181341683

安装git

仅实例安装,配置 用户名 和 邮箱 那些的操作请自行搜索。

1
sudo apt install git

安装工具链/编译器

  1. 官网 去下载自己需要的编译器。
  2. 然后进行解压到与 repo 相同位置的 ~/bin (放其他位置也可以)。
  3. 设置系统变量

下方以 gcc-arm-none-eabi-5_4-2016q3 为例:

1
2
3
4
cd ~/Downloads
wget https://storage.islet.space/02_Softwares/06_Embedded/01_CrossCompiler/gcc-arm-none-eabi/gcc-arm-none-eabi-5_4-2016q3.tar.gz
tar -zxvf gcc-arm-none-eabi-5_4-2016q3.tar.gz
cp -r ~/Downloads/gcc-arm-none-eabi-5_4-2016q3 ~/bin/

安装编译工具

下方这些操作默认安装不指定版本的cmake和make。

1
sudo apt install cmake make

安装单元测试工具

1
sudo apt install lcov valgrind

安装repo

gitpython2repo 的依赖,记得先安装。

  1. 创建 ~/bin 路径。
  2. 选择国内源安装repo。
  3. 赋予 ~/bin/repo 执行权限。
  4. 使 REPO_URL 变成系统变量。
  5. ~/bin 放到 PATH 环境变量中。
  6. 使配置生效。。

这一步简化成下面这些操作,对照着执行即可。(千万不要直接用 apt install repo 进行安装,国内大部分情况用不了)

1
2
3
4
5
6
mkdir ~/bin
curl https://mirrors.tuna.tsinghua.edu.cn/git/git-repo > ~/bin/repo
chmod a+x ~/bin/repo
echo "export REPO_URL='https://mirrors.tuna.tsinghua.edu.cn/git/git-repo'" >> ~/.zshrc
echo "export PATH=~/bin:$PATH" >> ~/.zshrc
source ~/.zshrc

拉代码

下方仅实例 repo 工具的代码拉取指令

1
2
repo init -u git@github.com:xxx/xxxxxx.git -b dev
repo sync -j8

拉下来之后会有下面这些文件,其中 outtmp 是之后才生成的。

image-20220511154414265

编译命令

使用编写的脚本进行单元测试、编译和其他操作:

1
./sdk/build/build.sh --board stm32l476rg --compiler $ARM_GCC_PATH --debug

本文主要是将 在KEIL上能够成功编译的 STM32F103VE 芯片项目转移到 VS Code 的 EIDE 插件中,主要是针对 Keil MDK-ARM 中的 Option 进行参数复制,即 EIDE 的配置。

需要以下两个工具:

  • Keil MDK-ARM
  • Keil.STM32F1xx_DFP.2.4.0.pack

其实还是依托于 Keil MDK-ARM ,只是换了 VS Code 的皮。

EIDE INSTALL

首先需要在 VS Code 中安装 Embedded IDE(如下),官方手册:EIDE在线文档

image-20220414214014581

EIDE CONFIGURATION

对 EIDE 的配置主要包括 扩展设置芯片支持包安装构建参数设置项目属性设置

image-20220414211312253

扩展设置

可以在 VS Code 的插件中选中 Embedded IDE ,在齿轮状设置图标菜单里选择 扩展设置,在里面配置好编译工具链的路径还有一些可设置选项。

image-20220414203531929

STM32 可以用 ARM CC 和 ARM GCC 进行编译,具体需要看芯片要求,Keil 的话用的是 ARM CC 5版本或者 ARM CC 6 版本。

可以到 Keil MDK-ARM 的安装路径下进行查看,例如 在 D:\Keil_v5\ARM\ARMCC\bin 中,选择右键 用 Powershell 打开,然后输入 ./armcc.exe 即可查看版本号。

image-20220414183859215

主要配置六个参数即可,需要根据本地的 Keil 安装路径来进行设置(不要盲目复制粘贴)。

image-20220414203709473

image-20220414203744037

芯片支持包安装

Keil 的芯片支持包主要看 Option -> Target 下的 STM32F103xx.svd

image-20220414194711199

通过本地搜索可以看到这个文件需要通过安装 .pack 扩展包得到。

image-20220414190916865

MDK5 Software Packs (keil.com) 中搜索对应芯片的扩展包,如 Keil.STM32F1xx_DFP.2.4.0.pack

image-20220414193428926

点击 芯片支持包 右侧的 加号,即可选择通过 在线安装(From Repo) 或者 离线安装(From Disk)。

image-20220414212238565
image-20220414212220319

安装完扩展包之后 再点击下图中的加号,输入芯片型号进行进一步选择。

image-20220414191124478

即可查看芯片的大致信息:

image-20220414190706840

构建参数设置

构建参数的依据是 Keil 中的这几个参数选项卡:

image-20220414212732414

方法:

  1. 提取 Keil 中的构建参数 (如下 C/C++ 参数设置)
  2. 提取 EIDE 中的构建参数
  3. 对比差异,以 Keil 为准对 EIDE 进行增删

C/C++ 参数设置

下方是 Keil 中对 C/C++ 的构建参数管理页面:

image-20220414200627162

以下是从 Keil MD5 的 Option 中扒下来的编译参数,即最后一行的 Compiler Control String

1
2
3
4
5
6
-c --cpu Cortex-M3 -D__MICROLIB -g -O3 --apcs=interwork --split_sections -I include -I ../ -I ../../../Libraries/CMSIS/CM3/CoreSupport -I ../../../Libraries/CMSIS/CM3/DeviceSupport/ST/STM32F10x -I ../../../Libraries/STM32F10x_StdPeriph_Driver/inc -I ../../../Utilities/STM32_EVAL -I ../../../Utilities/STM32_EVAL/STM3210B_EVAL -I ../../../Utilities/STM32_EVAL/Common -I ../../STM32F10x_StdPeriph_Template -I ../MDK-ARM
-IF:/Workspace/xiwang_production_test_embedded/Project/STM32F10x_StdPeriph_Template/MDK-ARM/RTE/_STM3210B-EVAL
-ID:/Keil_v5/ARM/PACK/ARM/CMSIS/5.0.0/CMSIS/Include
-ID:/Keil_v5/ARM/PACK/Keil/STM32F1xx_DFP/2.4.0/Device/Include
-D__UVISION_VERSION="522" -D_RTE_ -DSTM32F10X_HD -DUSE_STDPERIPH_DRIVER -DSTM32F10X_HD -DUSE_STM3210B_EVAL
-o .\build\STM3210B-EVAL\*.o --omf_browse .\build\STM3210B-EVAL\*.crf --depend .\build\STM3210B-EVAL\*.d

以下是从 EIDE 中扒下来的编译命令:

1
2
3
4
5
6
7
8
9
10
11
......

C command line (armcc):

-c --apcs=interwork --cpu Cortex-M3 --li --c99 -D__MICROLIB -O0 --split_sections --diag_suppress=1 --diag_suppress=1295 -g -I.\.. -I.\..\..\..\Libraries\CMSIS\CM3\CoreSupport -I.\..\..\..\Libraries\CMSIS\CM3\DeviceSupport\ST\STM32F10x -I.\..\..\..\Libraries\STM32F10x_StdPeriph_Driver\inc -I.\..\..\..\Utilities\STM32_EVAL -I.\..\..\..\Utilities\STM32_EVAL\STM32100E_EVAL -I.\..\..\..\Utilities\STM32_EVAL\Common -I.\.cmsis\dsp_lib -I.\.cmsis\include -I.\RTE\_STM32100E-EVAL -I.\.eide\deps -I.\include -I.\.eide\deps -DUSE_STDPERIPH_DRIVER -DSTM32F10X_HD_VL -DUSE_STM32100E_EVAL -DGD32F10X_HD

CPP command line (armcc):

-c --cpp --apcs=interwork --cpu Cortex-M3 --li -D__MICROLIB -O0 --split_sections --diag_suppress=1 --diag_suppress=1295 -g -I.\.. -I.\..\..\..\Libraries\CMSIS\CM3\CoreSupport -I.\..\..\..\Libraries\CMSIS\CM3\DeviceSupport\ST\STM32F10x -I.\..\..\..\Libraries\STM32F10x_StdPeriph_Driver\inc -I.\..\..\..\Utilities\STM32_EVAL -I.\..\..\..\Utilities\STM32_EVAL\STM32100E_EVAL -I.\..\..\..\Utilities\STM32_EVAL\Common -I.\.cmsis\dsp_lib -I.\.cmsis\include -I.\RTE\_STM32100E-EVAL -I.\.eide\deps -I.\include -I.\.eide\deps -DUSE_STDPERIPH_DRIVER -DSTM32F10X_HD_VL -DUSE_STM32100E_EVAL -DGD32F10X_HD

......

EIDE 中查看编译命令的方法:项目名称右键点击 查看生成的编译器命令行 即可。

image-20220414194229852

互相比对二者之间的编译参数差异,发现以下差异:

  1. Keil 中的代码优化等级为 3 即参数 -O3 ,而 EIDE 中为 0 即参数 -O0
  2. EIDE 比 Kei多了几个参数 --diag_suppress=1 --diag_suppress=1295 ,需要删除。

ASM 和 Linker 参数设置

对比过 Keil 的参数之后,保持如下设置:

image-20220414213239217
image-20220414213257541

项目属性设置

包含路径设置

这个就不多说了。

需要注意的是,RTE路径下的 STM32xxx-EVAL 一定要是正确的,可以多,不要少。

image-20220414213503962

预处理定义

从 EIDE 导入 Keil 项目时,可能回设置很多不需要或者错误的 预处理定义(宏定义),需要跟 Keil 保持一致。

image-20220414213732758

image-20220414195358900

DEBUG RECORDS

EXPECTED A }

提示 少了 } ,该文件是官方文件,应该不会错。经过检查,发现是宏定义过多导致的错误,修改过 预处理定义 中的宏定义设置就解决了。

image-20220414190748098

如下,STM32F10X_HDSTM32F10X_HD_VL 冲突了。

image-20220414194044509

最后,编译结果:

1
2
3
4
5
6
7
8
9
10
11
12
13
14
15
16
17
18
19
20
21
22
23
24
25
26
27
28
29
30
31
32
33
34
35
36
37
38
39
40
41
42
43
44
45
46
47
48
49
50
51
52
53
54
55
56
[ INFO ] start building at 2022-04-14 20:22:39

[ TOOL ] ARM Compiler 5.06 update 4 (build 422)

[ INFO ] file statistics (rebuild mode)

+---------+-----------+-----------+-----------+--------+
| C Files | Cpp Files | Asm Files | Lib Files | Totals |
+---------+-----------+-----------+-----------+--------+
| 46 | 0 | 1 | 0 | 47 |
+---------+-----------+-----------+-----------+--------+

[ INFO ] start compilation (jobs: 4) ...

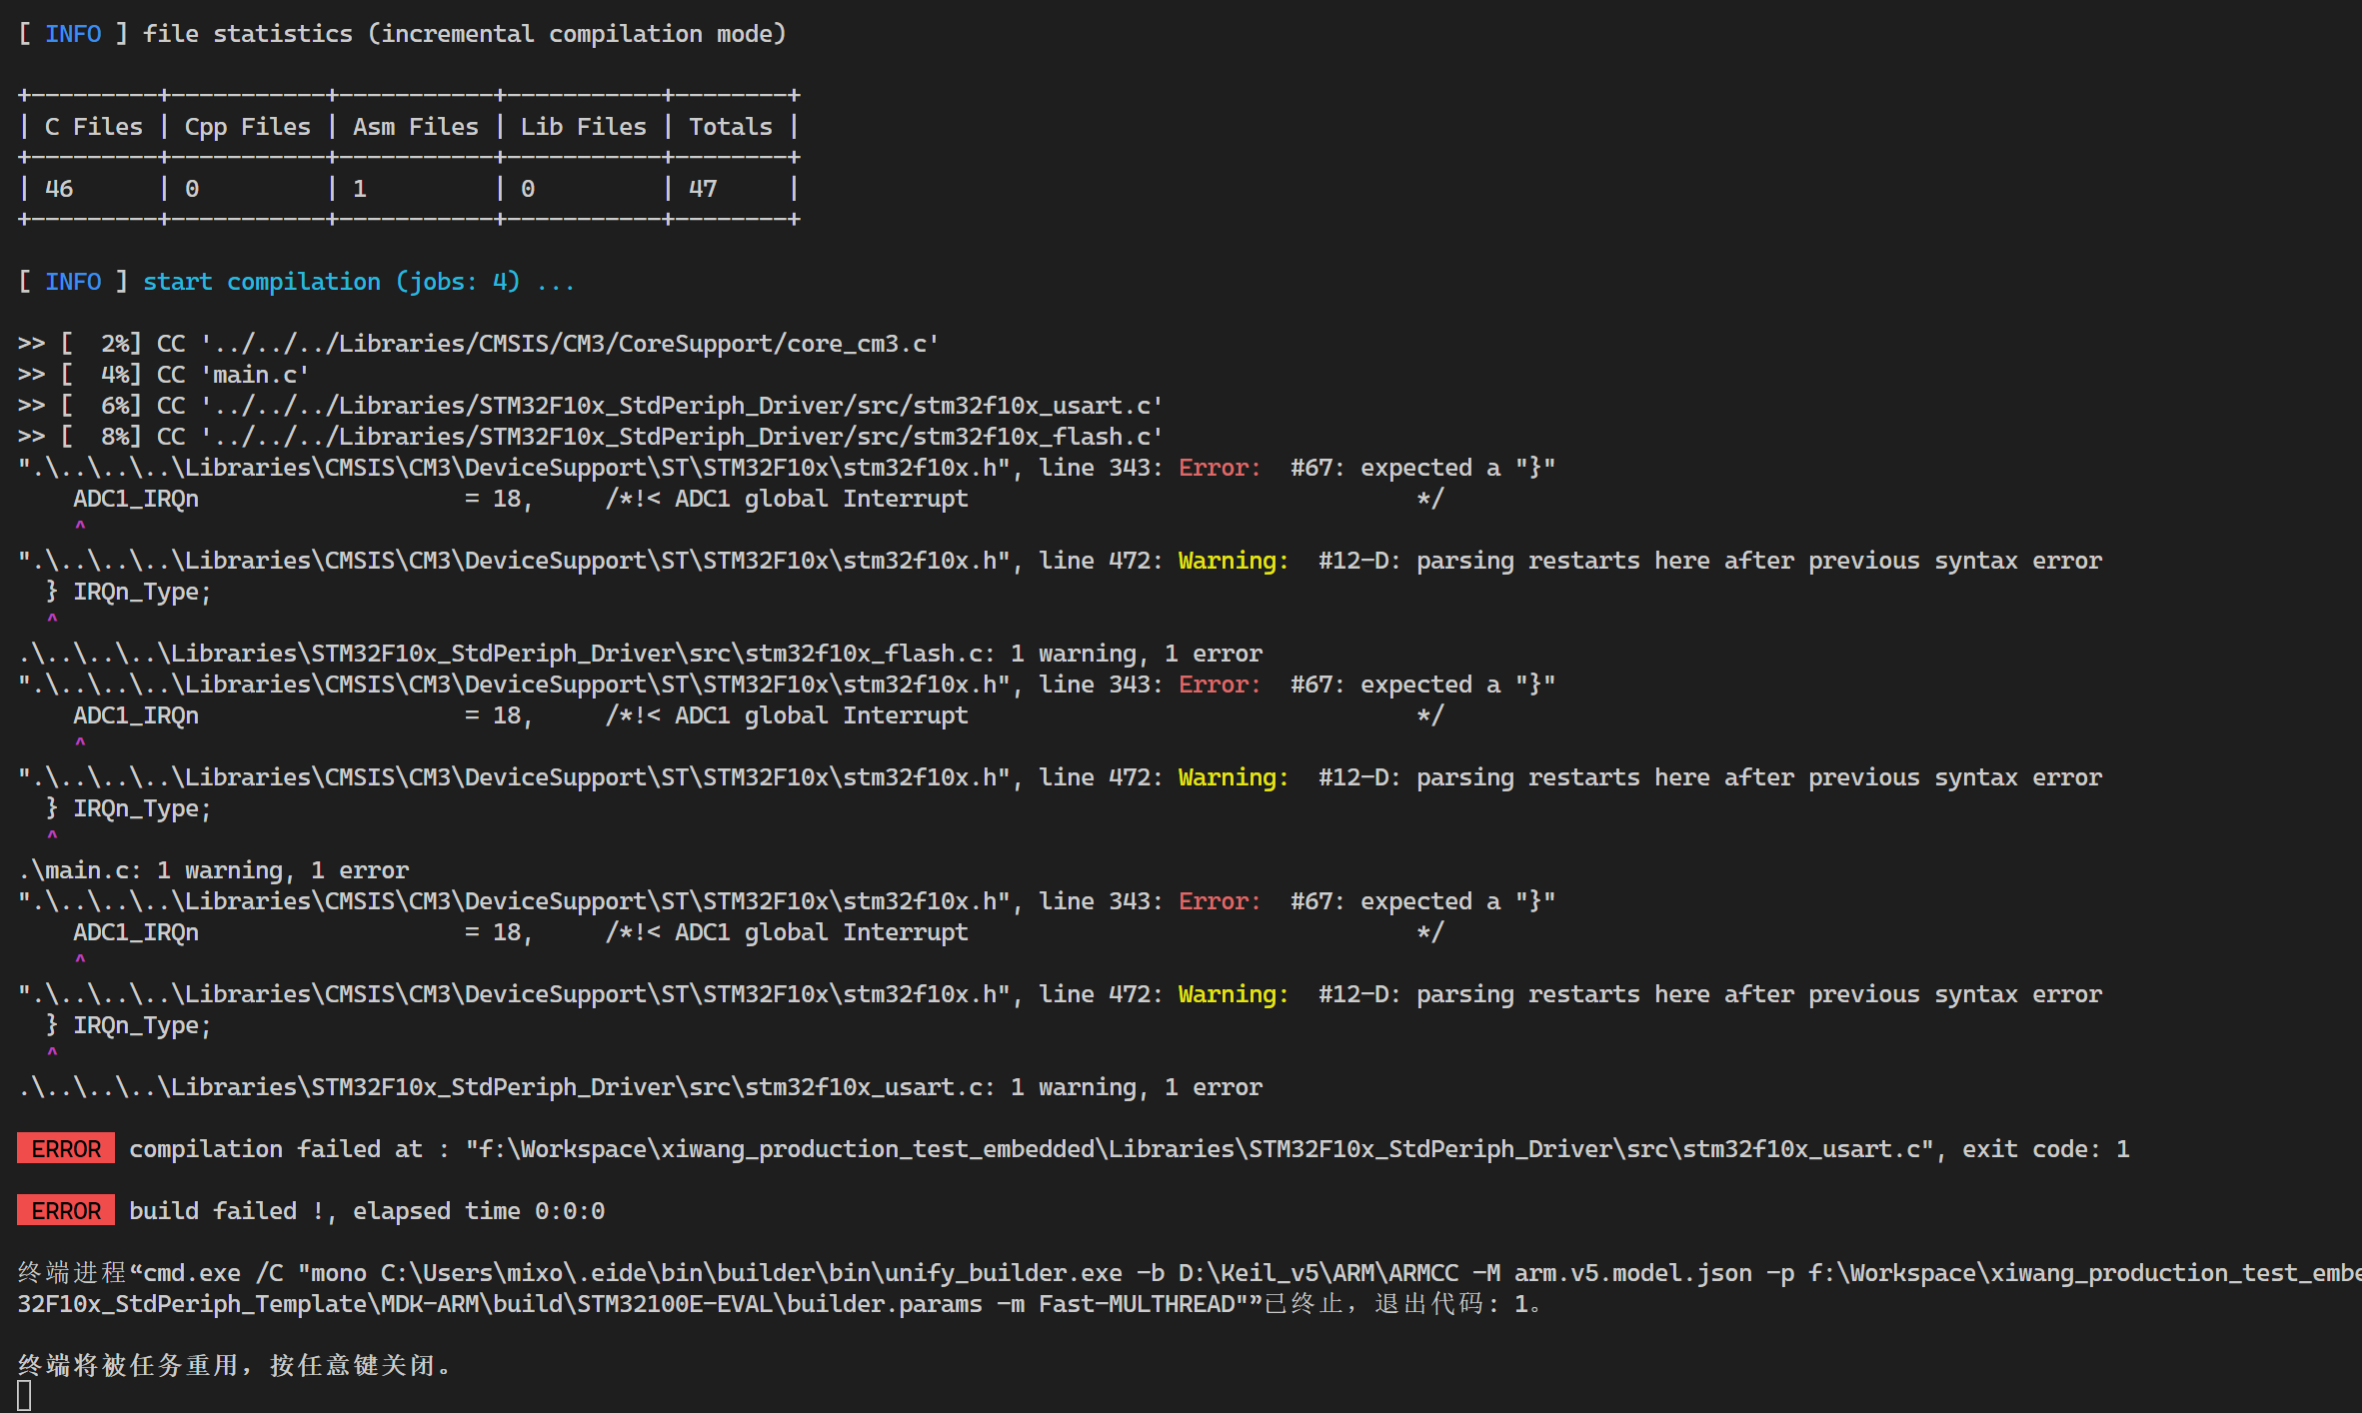
>> [ 2%] CC '../../../Libraries/CMSIS/CM3/CoreSupport/core_cm3.c'
>> [ 4%] CC 'main.c'
>> [ 6%] CC '../../../Libraries/STM32F10x_StdPeriph_Driver/src/stm32f10x_flash.c'
>> [ 8%] CC '../../../Libraries/STM32F10x_StdPeriph_Driver/src/stm32f10x_usart.c'
......
>> [ 89%] CC 'source/stm32f10x_it.c'
>> [ 91%] CC '../../../Utilities/STM32_EVAL/STM32100E_EVAL/stm32100e_eval_lcd.c'
>> [ 93%] CC 'source/system_stm32f10x.c'
>> [ 95%] CC '../../../Utilities/STM32_EVAL/stm32_eval.c'
>> [ 97%] CC 'source/write.c'
>> [100%] AS '../../../Libraries/CMSIS/CM3/DeviceSupport/ST/STM32F10x/startup/arm/startup_stm32f10x_hd_vl.s'

[ INFO ] start linking ...

Program Size: Code=9028 RO-data=340 RW-data=156 ZI-data=1412

Total RO Size (Code + RO Data) 9368 ( 9.15kB)
Total RW Size (RW Data + ZI Data) 1568 ( 1.53kB)
Total ROM Size (Code + RO Data + RW Data) 9524 ( 9.30kB)

RAM : [ ] 2.4% 1.5KB/64.0KB
FLASH: [ ] 1.8% 9.3KB/512.0KB

[ INFO ] start outputting file ...

>> output hex file [done]

file path: "build/STM32100E-EVAL/FT_Test.hex"

>> output s19 file [done]

file path: "build/STM32100E-EVAL/FT_Test.s19"

>> output bin file [done]

file path: "build/STM32100E-EVAL/FT_Test.bin"

[ DONE ] build successfully !, elapsed time 0:0:9

[ INFO ] run tasks after build ...

>> axf to elf [done]

类似于 gnuplot , matplotlib 也是开源的图形绘制软件。

需要使用到的工具如下:

  • Jupyter:python 分布调试 和 Markdown 笔记记录一体化工具。
  • Python3.10
  • Python3 插件: matplotlib / pandas
  • VS code 所需插件: pylance

其中, matplotlib 是绘图所用的开源工具库,而 pandas 是文档管理的 “瑞士军刀”。

环境安装

JUPYTER 安装

Jupyter可以支持在线和离线使用,在线即以网页形式支持使用,可以在服务器上进行部署。离线即在 Visual Studio Code 中以插件形式提供安装和使用。

在线安装

以 Ubuntu 系统为例,可以用 apt 进行安装,也可以用 pip (或 pip3 )进行安装。

1
sudo apt install jupyter

在线版 Jupyter 还需要安装一个 ipyparallel 的类:

1
2
pip3 install ipyparallel
ipcluster start

远程访问配置项

参考 《ubuntu 安装Juypter并设置远程访问》对 服务器端 Jupyter进行设置和访问测试。

相关防火墙设置 / 证书 / 域名 不再赘述。

自启动配置

另外,Linux 服务器端 Jupyter 用 jupyter notebook 命令启动,无法开机自启,需要参考 《Linux下Jupyter开机启动设置》 进行设置。

设置好后 在线版 Jupyter 编辑器的页面如下:

在线使用界面

离线安装

在 VS code 插件中搜索并安装第一个 Jupyter 即可,插件系统会自动安装下面附带的 Jupyter KeymapJupyter Notebook Renderers 两个插件。

image-20220327163752153

安装完之后,需要新建一个 .ipynb 格式的文件,即可自动打开 Jupyter 插件进行使用。

离线使用界面

PIP 依赖库安装

在线版和离线版都需要使用 terminal 打开并输入命令进行安装下方的依赖库:

1
pip3 install matplotlib pandas

图形生成代码

下方利用 pandas 类对 .csv 文件中的相关列进行数据提取,然后利用 matplotlib 类对 数据进行绘图。

因功能比较简单,不再赘述。

具体需要注意的事项已在代码注释中写明。

1
2
3
4
5
6
7
8
9
10
11
12
13
14
15
16
17
18
19
20
21
22
23
24
25
26
27
28
29
30
31
32
33
34
35
36
37
38
39
40
41
42
43
44
45
46
47
48
49
50
51
52
53
54
55
56
57
58
59
60
61
62
63
64
65
66
67
68
69
70
71
72
73
74
75
76
77
78
79
80
81
82
83
84
85
86
87
88
89
90
# 导入依赖库
import numpy as np
import pandas as pd
import csv

# 导入工具
from pandas import Series,DataFrame
from matplotlib import pyplot as plt
from matplotlib.font_manager import FontProperties

# 配置csv表格中的行信息
column=["ts","dx","dy","motion","iqc","shutter","frame_avg","status"]

# 设置文件路径
csv_file_path = '../data/'
pic_file_path = '../pic/'

# 输入和输出文件名
file = '20220327_135012'
csv_file_name = file + '.csv'
pic_file_name = file + '.jpg'

# 配置各轴及标题标签
chart_title = 'A4 data collection in stm32l476rg'
x_label = 'time(ms)'
y_label = 'data collected'

# 配置各线段标签
line_1_label = 'dx'
line_2_label = 'dy'

# 配置线段透明度
line_1_alpha = 0.5
line_2_alpha = 0.5

# 配置线段类型
# 可选 scatter 和 line
plot_type = 'scatter'

# 用于正常显示中文标签
plt.rcParams['font.sans-serif']=['YAHEI']
# 用于正常显示正负号
plt.rcParams['axes.unicode_minus']=False

# 定义空列表存放xy轴数据点
x = []
y = []
z = []

'''
# 可以使用open()方法对csv文件进行读取
# 但是暂时没有找到可以避免读取到头部信息的方法,即不能跳过部分数据进行读取
with open( csv_file_path + csv_file_name, 'r', encoding='utf8') as csv_file:
plots = csv.reader(csv_file, delimiter=',')
for row in plots:
x.append(int(row[0]))
y.append(int(row[1]))
z.append(int(row[2]))
'''

# 使用panda的read_csv()方法可以设置跳过部分数据进行处理
csv_file = pd.read_csv(csv_file_path + csv_file_name,
skiprows=21,
delimiter=',',
names=column)

# 将对应列数据放入变量中
x = csv_file['ts']
y = csv_file['dx']
z = csv_file['dy']

# 设置线段标签
if( plot_type=='line'):
plt.plot(x,y, label=line_1_label, alpha=line_1_alpha, lw=1)
plt.plot(x,z, label=line_2_label, alpha=line_2_alpha, lw=1)
elif( plot_type == 'scatter'):
plt.scatter(x,y, label=line_1_label, alpha=line_1_alpha, s=1)
plt.scatter(x,z, label=line_2_label, alpha=line_2_alpha, s=1)

# 设置x轴、y轴和标题标签
plt.xlabel(x_label)
plt.ylabel(y_label)
plt.title(chart_title)

# 展示图像
plt.legend()

# 图像保存
plt.savefig( pic_file_path + pic_file_name , dpi=400)
plt.show()

使用方法

  1. 生成一个文件夹,下面包含三个并行子路径。
1
2
3
├── data
├── pic
└── src

网页版:

网页版文件结构示意
  1. 将代码放到 src/ 中,在将代码第19行中的 file = '20220327_135012' 文件名进行修改,确保其与 data/ 路径下的 .csv 文件名成可以对上。
  2. 执行整段代码,即可在 pic/ 文件夹下找到对应的图像文件。

REFERENCE

  1. vscode写jupyter notebook

  2. Pandas将csv数据拆分成多列并保存

TOOLS DOWNLOAD AND SETUP

在 ST 官网下载了 CubeMX 的 Mac 版软件,然后会发现关闭安全相关的限制也没办法打开该软件包。

image-20220222205346872

通过 tree 命令查看目录可以找到一个叫 SetupSTM32CubeMX-6_3_0 的应用程序,运行该文件即可进行安装。

image-20220222205452868

Mac 系统上可运行的程序都是 .App 结尾的文件夹,直接点击右键的 显示包内容 即可进入查看。

image-20220222205524560

双击 SetupSTM32CubeMX-6_3_0 即可运行安装程序。

image-20220222205545346

NEW PROJECT

在 CubeMX 的 Home 界面,可以 根据芯片型号新建项目,也可以 根据ST板子型号新建项目

image-20220222213510204

只需要在对应需要的 MCU 或者 板子上双击即可。

image-20220222213140557

如果使用ST自家的评估板,新建项目时建议直接选择 ACCESS TO BOARD SELECTOR

image-20220222212802407

它会帮助默认设置一些板子上的外设(它会提示 Initialize all peripherals with their default Mode? ),就不用用户自己去设置,否则选择 ACCESS TO MCU SELECTOR 就会在某些地方上产生默认配置差异,如 GPIO。

image-20220222213201459

下图为根据 ST 板子型号生成项目时默认配置的一些外设引脚。当然,还需要自行设置各个需要使用到的引脚的具体配置,如输入/输出、拉高/拉低等等。

image-20220222213417943

下图为根据 ST 芯片信号生成项目时默认不配置任何引脚:

image-20220222213744404

DEBUG RECORDS

cmake .. ; make 时发现 cmake 无误,而 make 报错,提示 attempt to rename sepc 'link' to already defined spec 'nano_link'

image-20220222224906371

具体报错信息如下:

1
2
3
4
5
fatal error: /Users/liewzheng/bin/gcc-arm-none-eabi-5_4-2016q3/bin/../lib/gcc/arm-none-eabi/5.4.1/../../../../arm-none-eabi/lib/nano.specs: attempt to rename spec 'link' to already defined spec 'nano_link'
compilation terminated.
make[2]: *** [led_blink.elf] Error 1
make[1]: *** [CMakeFiles/led_blink.elf.dir/all] Error 2
make: *** [all] Error 2

CMakeLists.txt 文件中只有以下此句设计 specnano 关键字(下方注释是后来加上去的),此配置在 linux 平台上是运行正常的。

1
2
3
4
5
# 如果提示 linker 相关的错误,请删除  `-specs=nosys.specs` 和 `-specs=nano.specs` 这两个标志及所在临时文件夹并再次 `cmake .. ; make` 进行尝试
SET(CPU "-mcpu=cortex-m4")
SET(FPU "-mfpu=fpv4-sp-d16")
SET(FLOAT_ABI "-mfloat-abi=hard")
SET(MCU "${CPU} -mthumb ${FPU} ${FLOAT_ABI}" --specs=nosys.specs -specs=nano.specs)

解决方法

根据 Building Error from imported STM32CubeMX project 的解决方法,删除 -specs=nosys.specs-specs=nano.specs 这两个连接器的标志即可编译通过。

image-20220222230947465

删除该两个标志后,MCU 变量为 SET(MCU "${CPU} -mthumb ${FPU} ${FLOAT_ABI}"

WARNING: CANNOT FIND ENTRY SYMBOL ARCH_PATHS_FIRST

image-20220222235232398

本文只涉及 Jenkins 在 Debian Linux (Kali) 下的相关安装,不涉及使用教程,关于Jenkins的相关科普请自行搜。

Jenkins安装

Jenkins 可以通过两种方式运行:

  • 通过官网下载 http://mirrors.jenkins.io/war-stable/latest/jenkins.war 程序,并确保安装了 openjdk-8 即可。此种方式是直接运行 .war 的软件的,免安装,但基于 ssh 远程连接的用户断开连接之后可能会导致无法运行。即,如果不知道如何正确操作shell以便在后台运行该免安装程序,就不推荐使用。
  • 另一种是安装版本,仍然需要用户提前先安装好 openjdk-8 ,然后通过 官网教程 来添加源和使用 apt 命令进行安装。这种方式可以使用 systemctl 命令确保 Jenkins 开机自启动并在后台运行。

JAVA SETUP

需要注意的是,jre有 oracle 版本和 openjdk 版本,需要安装后者。

1
sudo apt update ; sudo apt upgrade ; sudo apt install openjdk-8-jre

JAVA_HOME 写到你对应的 shell 配置文件中。

1
2
3
export JAVA_HOME=/usr/lib/jvm/java-1.8.0-openjdk-amd64
export CLASSPATH=$JAVA_HOME/jre/lib/rt.jar:$JAVA_HOME/lib/dt.jar:$JAVA_HOME/lib/tools.jar
export PATH=$JAVA_HOME/bin:$PATH

免安装运行

下面就是使用 java -jar jenkins.war --httpPort=8080 命令来免安装运行的。

image-20220224003818560

安装运行

实际上,直接运行下面的 sudo apt install openjdk-11-jre 可能会导致无法运行,原因不明,还是推荐自行使用 sudo apt install openjdk-8-jre 进行安装。

image-20220224191828341

防火墙配置

这一点就不再赘述了。

  1. 开启系统内端口:用 iptables 参考 《CentOS7安装iptables防火墙》,注意看后面评论内容。
  2. 开启控制台端口:配置为云服务器的要去网页界面的控制台将对应端口打开。

Jenkins配置

安装完毕之后,在浏览器中输入 对应网址的 8080 端口,进入页面后输入管理员密码。

image-20220224003852043

选择新手入门配置安装插件。

image-20220224003716199

安装完毕之后就会让你设置管理员账户。

虽然,java11是推荐安装,可我就是运行失败。

image-20220224004120934

基本上也就只参考了廖雪峰这篇 《 搭建Git服务器 》 的文章。

部署git服务器

确保已安装git

for debian linux:

1
sudo apt install git 

and check the version of it:

1
git --version

创建git账户

Add a account name git in linux :

1
sudo adduser git

设置使用者的SSH配置

Copy the SSH keys of your client computers to save to the file in /home/git/.ssh/authorized_keys .

禁用shell登录

For the safety of your server, you should ban the shell login for git account.

1
sudo vim /etc/passwd

Find something like git:x:1001:1001:,,,:/home/git:/bin/bash , and modify it to:

1
git:x:1001:1001:,,,:/home/git:/usr/bin/git-shell

git用户可以正常通过ssh使用git,但无法登录shell,因为已经为git用户指定的git-shell每次一登录就自动退出。

新建仓库

  • Build a directory named srv to store the repositories. (Of course you can name it the way you like.)
  • Initializa a new bare repository name xxx.
  • Change its owner as the user git which is just created before.
1
2
3
cd /srv/
sudo git init --bare /srv/xxxx.git
sudo chown -R git:git /srv/xxxx.git

And you can copy the script below TO CREATE YOUR NEW REPOSITY. Remember to save it as .sh file and use chmod +x command to make it executable.

By default, this script is stored as gitInit.sh in the diretory /srv.

If you change the script execute diretory, remember to modify the script below.

1
2
3
GIT_REPOSITORY=$1
sudo git init --bare $GIT_REPOSITORY.git
sudo chown -R git:git $GIT_REPOSITORY.git

USAGE:

1
./gitInit.sh <newRepository>

使用仓库

到这一步为止,已经可以使用 git pull git@<yourServer>:/srv/xxx.git 进行仓库拉取了。

1
$ git clone git@<yourServer>:/srv/sample.git

And you will see:

1
2
Cloning into 'sample'...
warning: You appear to have cloned an empty repository.

如果需要添加一个固定的远程仓库,需要使用到 url ,即需要开启了 443 端口的服务器。

其他服务器管理

证书颁发

如下所示,下面的子域名已经签审了 SSL 证书了,可以正常使用 443 端口不被拒绝。

image-20220223015715136

防火墙设置

确保腾讯云服务器管理页面下的防火墙设置中已开启 443 端口。

image-20220223015852398

使用 ubuntu 和 centos 系统的可以参考 《CentOS7安装iptables防火墙》 开启 443 端口,直接运行下面命令即可:

1
sudo iptables -A INPUT -p tcp --dport 443 -j ACCEPT

克隆远程仓库

如果本地已有仓库,可能会与远程服务器的 master 分支冲突,需要自行使用 git fetch 管理,然后使用 git push --set-upstream master 进行上传。

image-20220223014741138

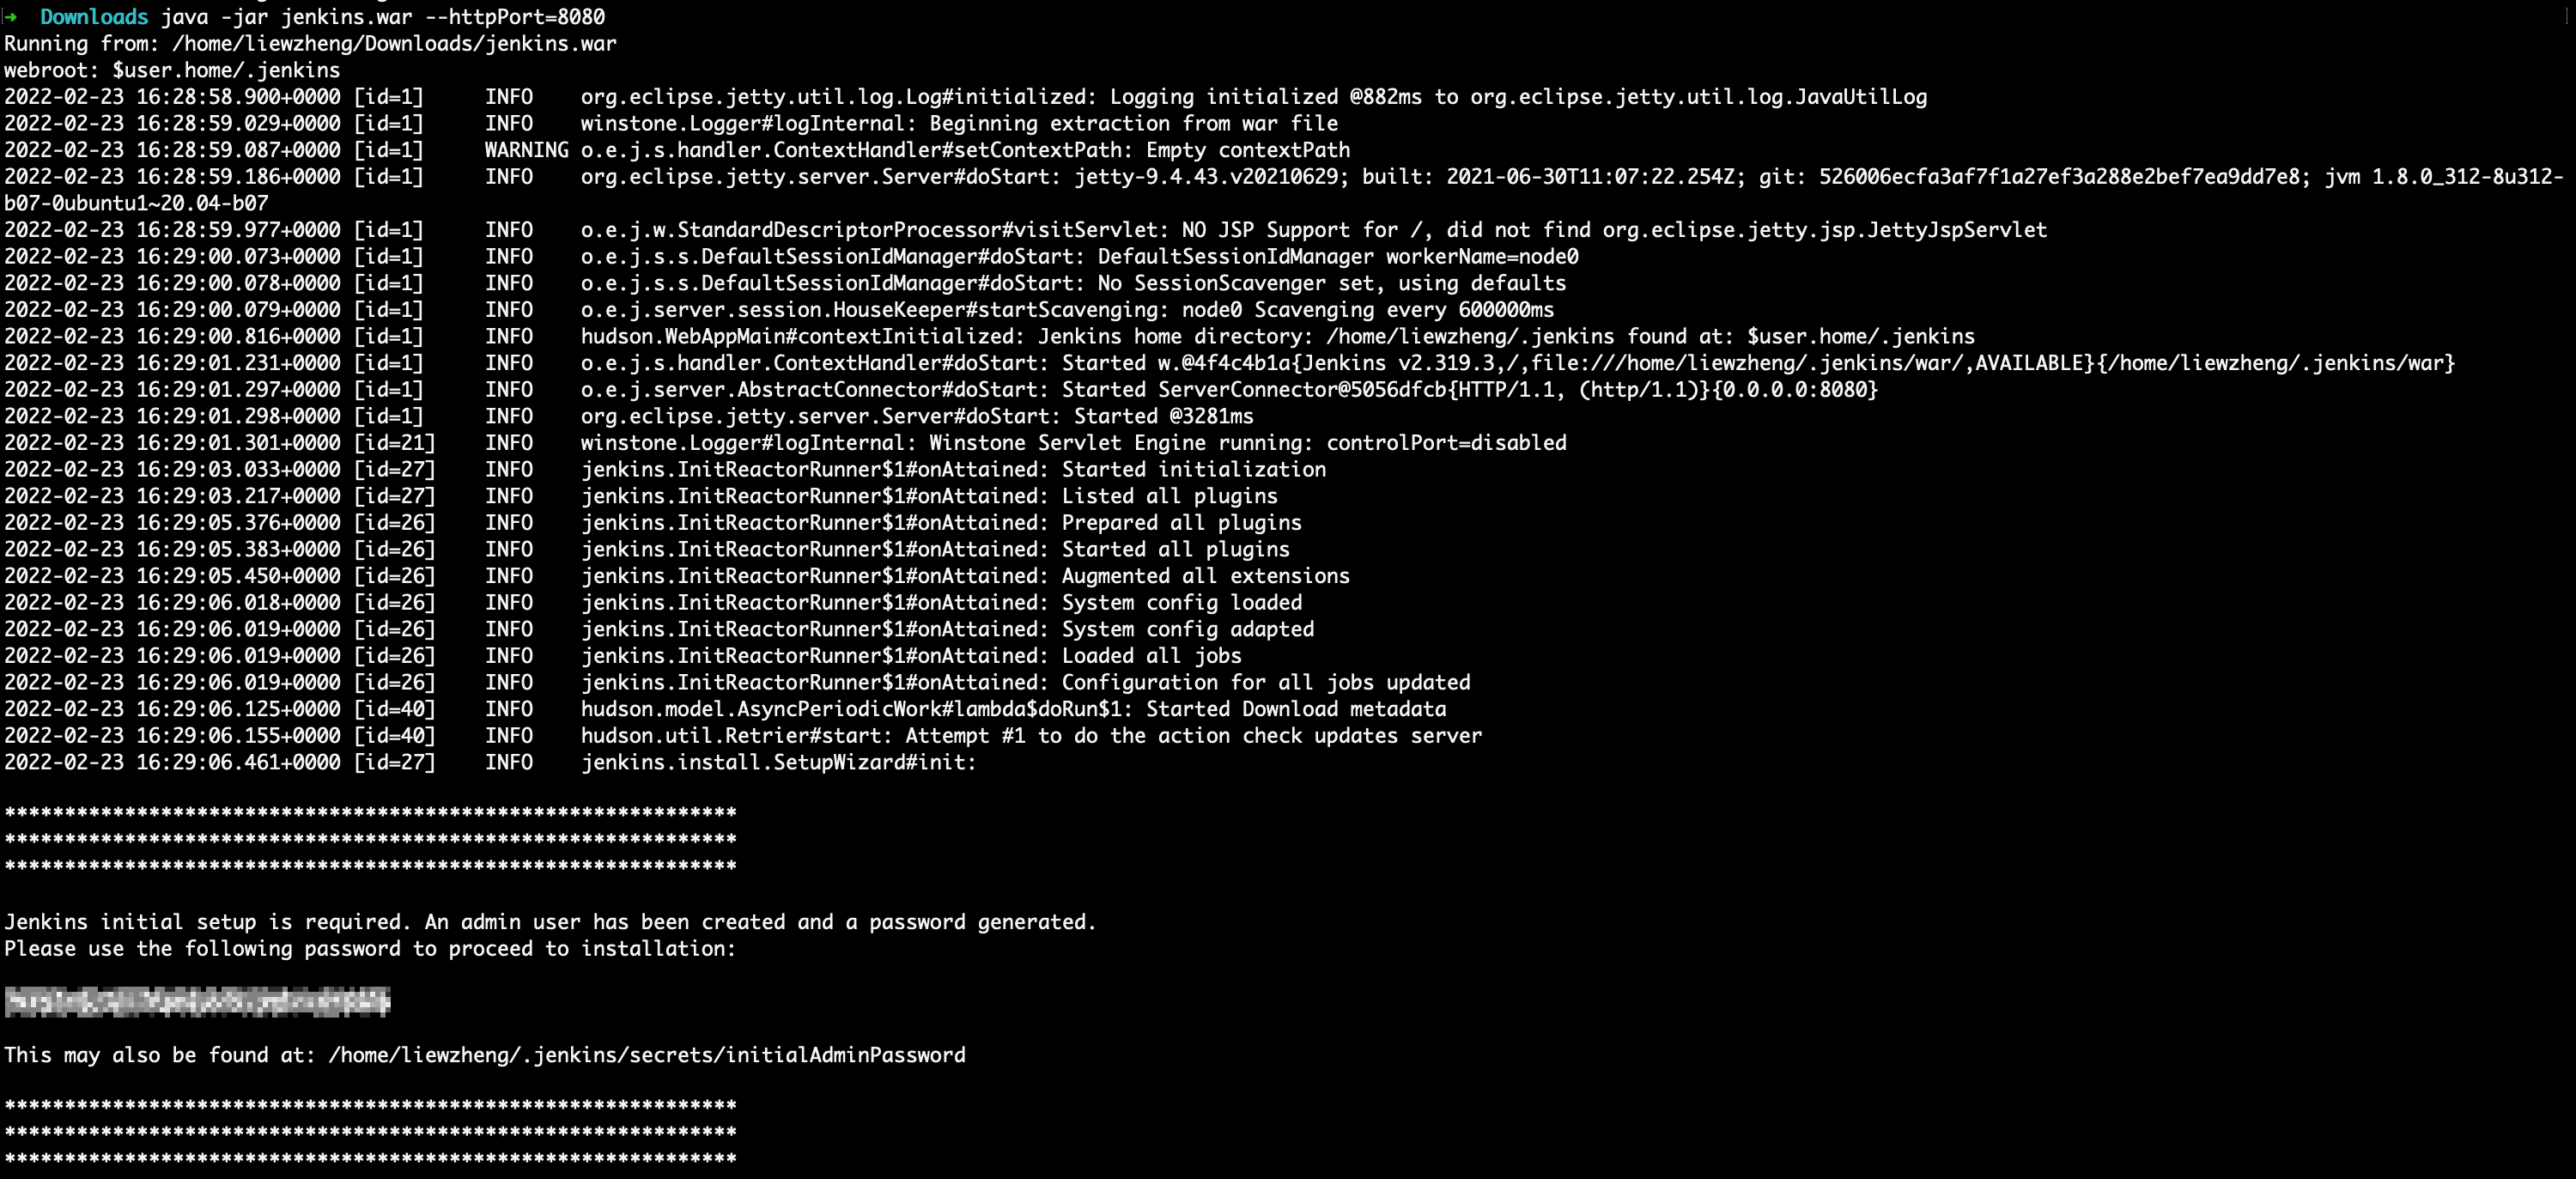
Mac 平台自带的 zsh 真的极不好用,同样是 unix-like 平台,跟 kali 平台上的 zsh 体验相差甚远。 一直都是黑白配色,而且修改中断和配置的动手能力确实没有那么强。偶然适用了一下 fish ,发现在 Mac 平台使用效果挺好的,就决定进行更换。切换成黑色背景后更为舒适了,之前一直使用瞎眼的白色。

image-20220223001619177

FISH SETUP

我安装了 MacPorts 包管理工具,直接用 port 命令即可安装 fish

1
sudo port install fish

ADD FISH TO /etc/shells

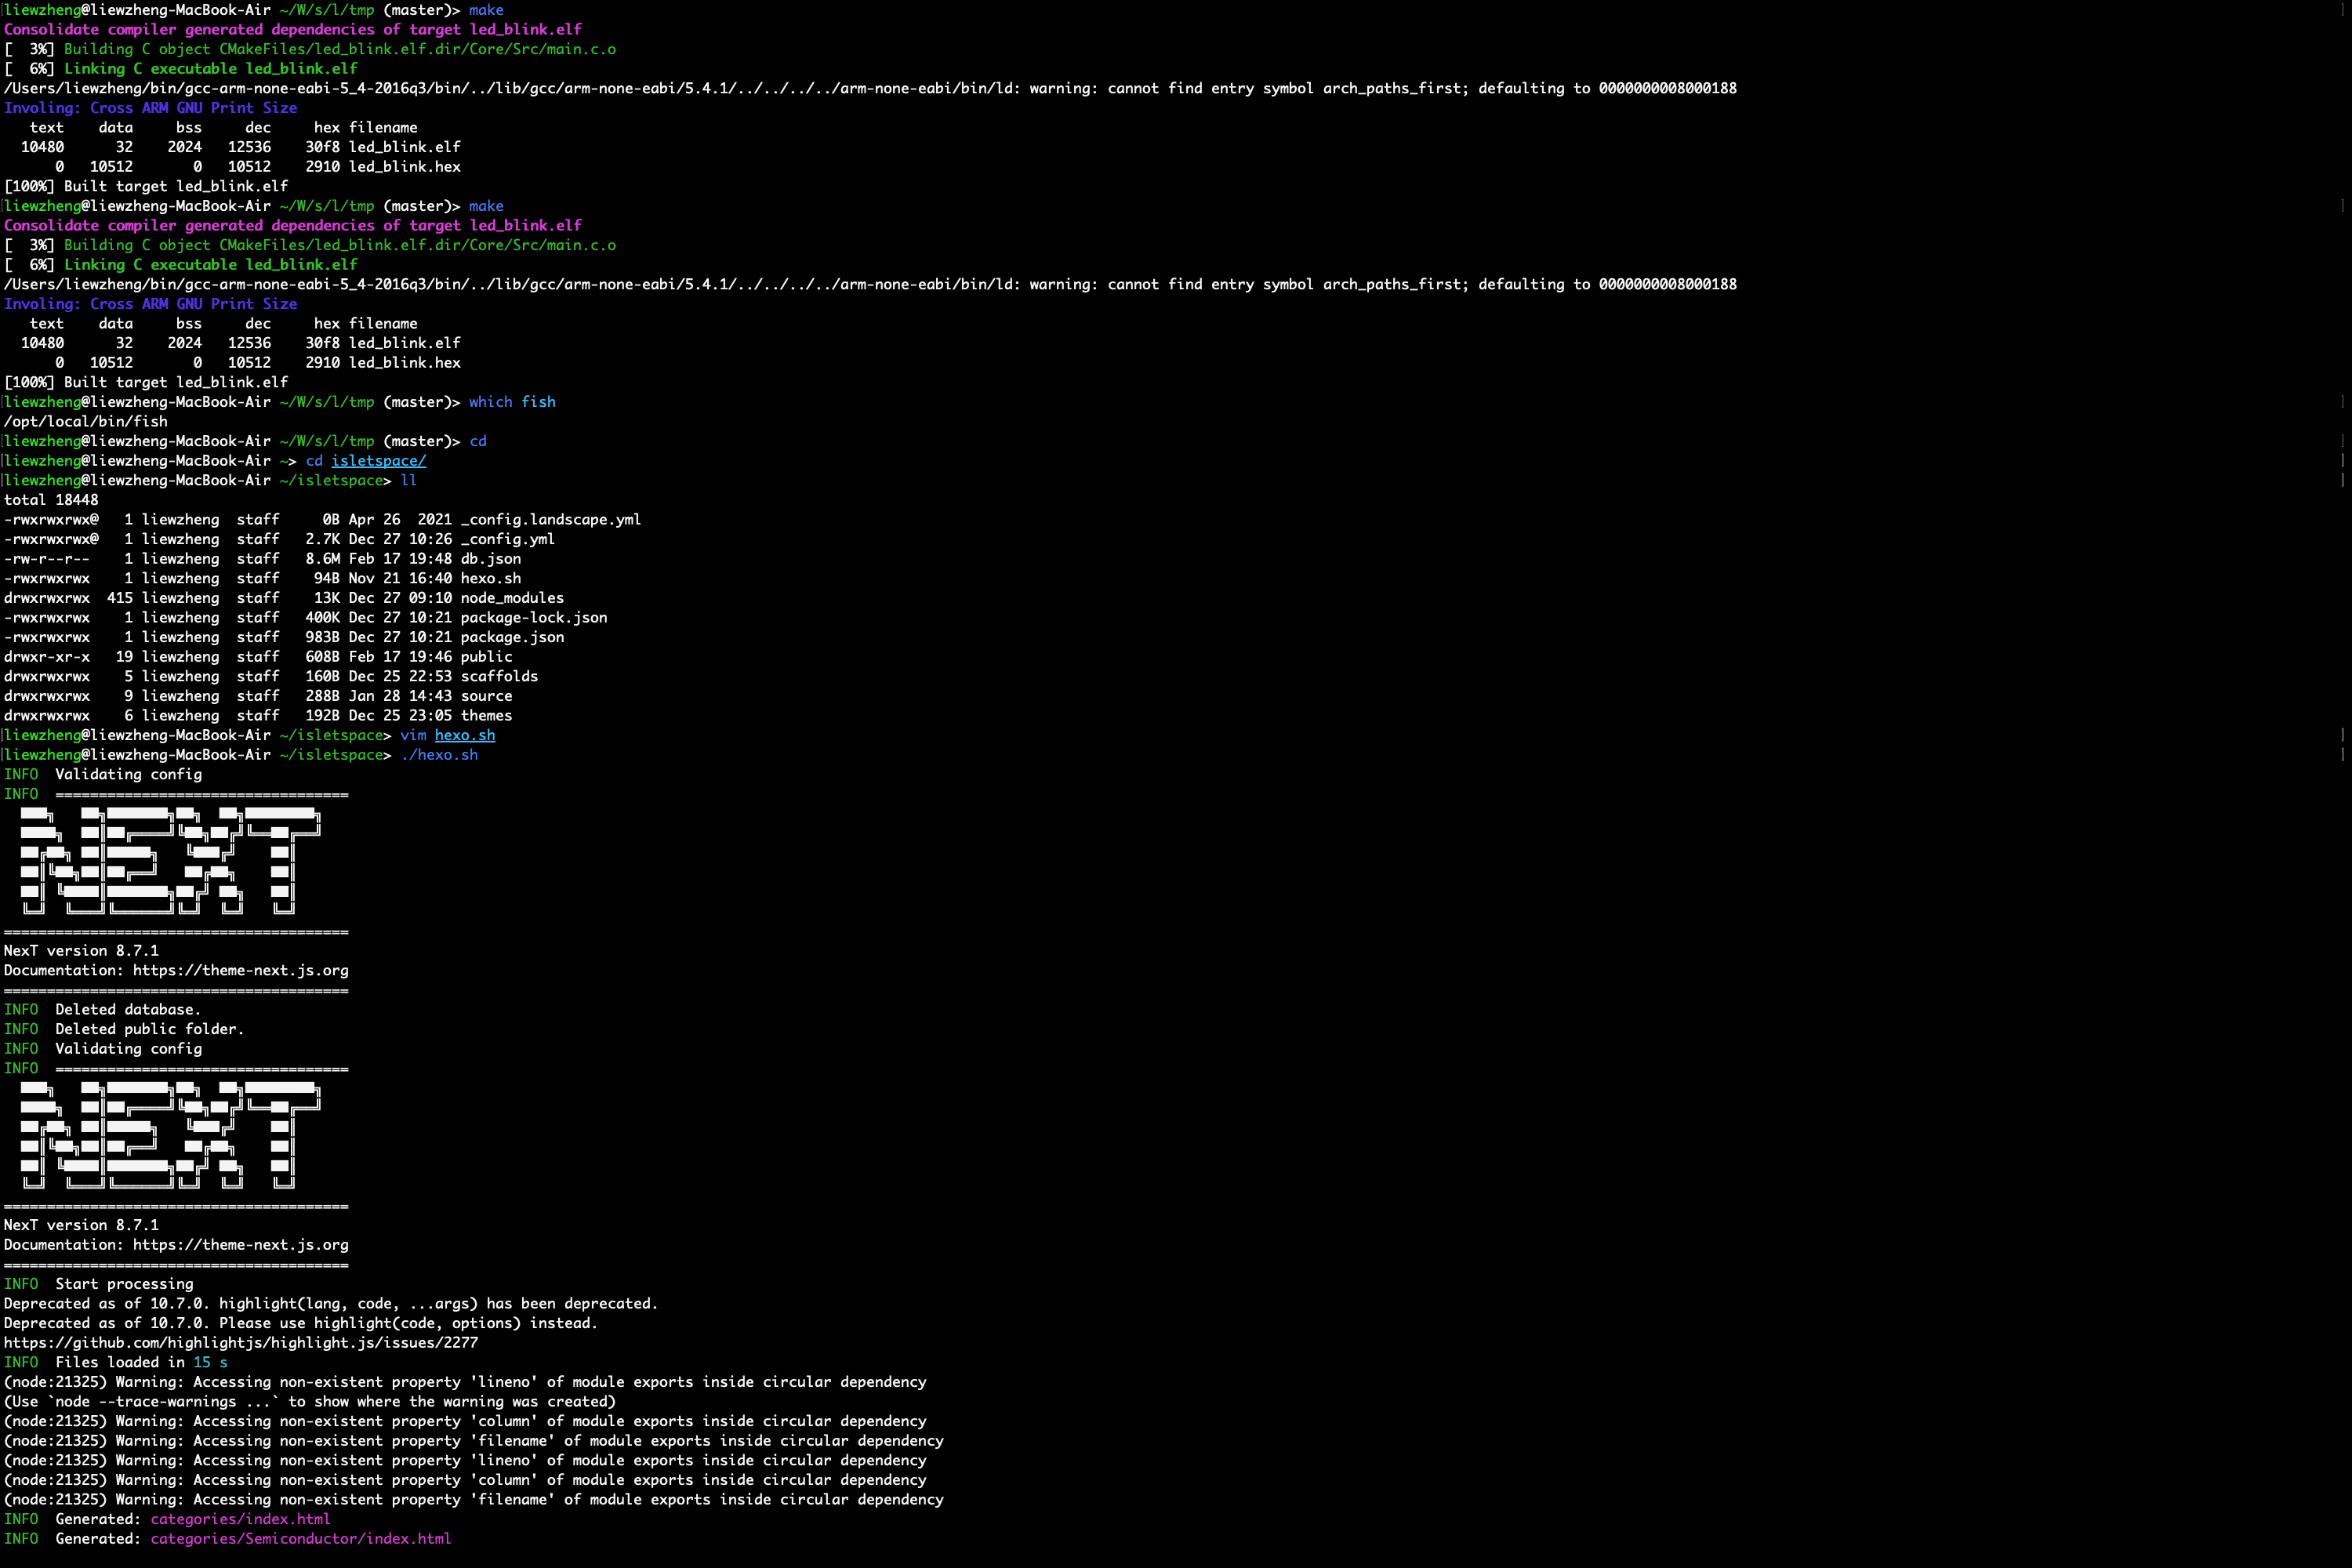
使用 which fish 可以调出 fish 的安装路径(用 port 安装的话默认路径是 /opt/local/bin/fish ),复制该路径,然后粘贴到 /etc/shells 文件末尾。

1
vim /etc/shells

NOTE:千万不要用 sudo vim /etc/shells 这样会修改到 root 管理员角色的 shell (如果出问题就会很麻烦),用户自己折腾自己的 shell 就好了。

通过 cat /etc/shells 可以查看所有可供使用的 shell 。

CHANGE DEFAULT SHELL

使用 chsh 语句即可将 fish 设置为默认 shell 。

1
chsh -s /opt/local/bin/fish

NOTE

fish 所使用的配置文件并非 ~/.fish 而是 ~/.bash_profile ,在里面修改完内容可以 source 该文件进行立即更新。